Why is it in your best interest to monitor failed authentications?
Alerting on failed authentication for log events is important because it can indicate potential security breaches or attempted attacks on your system. When an authentication attempt fails, it means that someone or something is attempting to gain access to your system without proper credentials. By monitoring failed authentication attempts and setting up alerts, you can quickly detect and respond to potential security threats. This allows you to take proactive measures to prevent unauthorized access and protect your system from security breaches.
According to MITRE Tactics, failed authentication attempts can also be a sign of brute force attacks, where attackers try multiple passwords or usernames until they find the right combination to gain access to a system. By monitoring these events, you can detect and respond to potential brute force attacks and take measures to prevent them from succeeding. In addition, monitoring failed authentication events can help you detect potential insider threats or account hijacking attempts, where legitimate user accounts are compromised or abused by malicious insiders or external attackers.
By having these requirements in place, you can effectively create alerting on failed authentication for log events and proactively monitor for potential security threats.
A step-by-step guide:
1. Create a Trail in CloudTrail
-
Sign into the AWS Management Console and open the CloudTrail console at CloudTrail console.
-
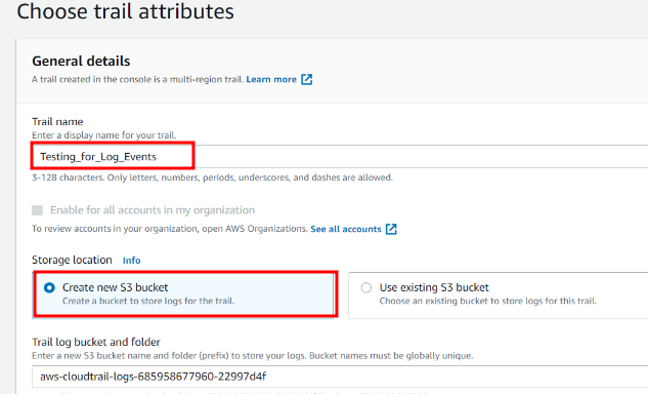
Navigate to Trails on the upper left side of the console and select Create trail.

-
Name your CloudTrail (for ex: login_events). You can use an existing S3 bucket or create a new one.
-
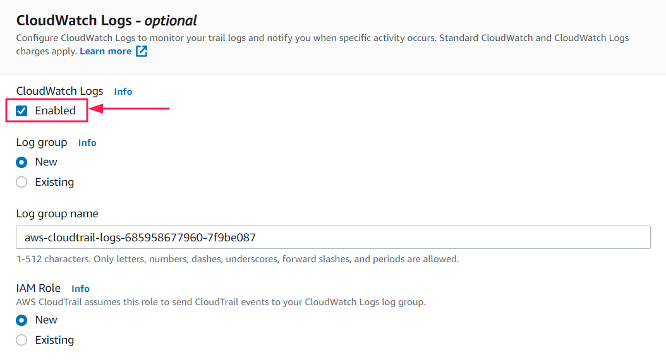
Make sure you enable the option under the CloudWatch logs to send the trails events to the CloudWatch for monitoring. Assign a new role or use an existing one and leave the rest of the settings on default. Click Next.
-
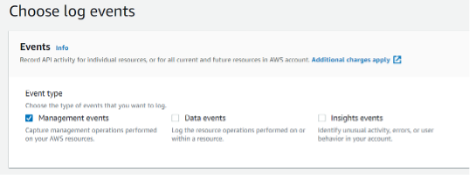
In the Choose log events section, we recommend keeping Management events. Selecting other options (Data events and/or Insights events) will mean additional charges.
-
And in the final step, review all your settings and click on Create trail.


Hurray!!! Now you created a CloudTrail. Let’s move to the next step.
2. Metric Filter for the LogGroup
-
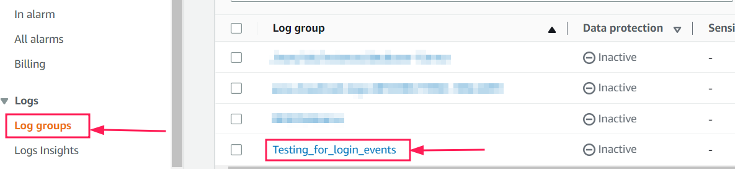
To create a metric filter, navigate to Amazon CloudWatch LogGroups. Under the Log Groups section on the left side, you can see the log group that we created to send our CloudTrail events to the log group.
-
Select a Log Group and under the Actions dropdown, click on Create metric filter to create a metric for the log group.

-
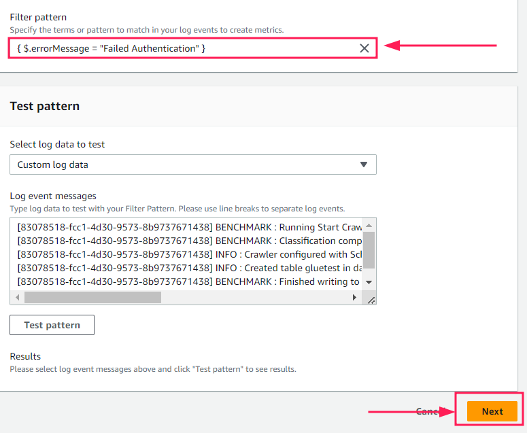
This Filter pattern matches log events that contain an exact message. For example, if you want to match log events that contain the message "Failed Authentication", you can use the filter pattern "{$.errorMessage = “Failed Authentication"}”.
-
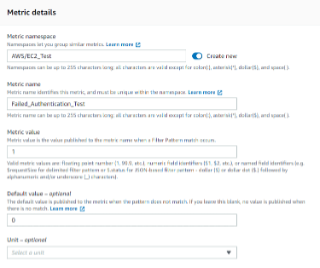
In the Assign Metric page, assign a filter name that suits your metric filter and in the Metric Details give Metric value as ‘1’. The more failed authentication attempts occur, the more CloudWatch's metric value spikes, accumulating each failed login as it happens, making it easier for you to keep track of potential security threats. Then click Next to review the metric and click on Create metric filter.
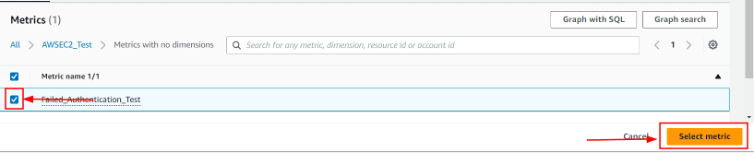
Great! You created a metric filter and to confirm that, you can navigate to the All Metrics section on the left side menu under the Metrics section and go to the Browse option to see the metrics you’ve created.
3. Alarm for Suspicious Activities
And now, onto the final step. By creating an alarm, you’ll get notified for the suspicious activities that happen on your applications:
-
Go to All alarms under the alarm section on your left CloudWatch menu, click on Create alarm.

-
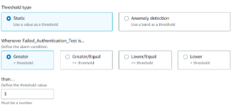
Select the metric that you want to create an alarm for.
-
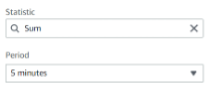
In the alarm preview section, select 5 minutes from the Period dropdown list and sum from the Statistic dropdown list.
-
Once you provide an email address, click on Create topic. You will receive a confirmation message from AWS to confirm the account that you intended to receive notifications on. (Check your spam folder for confirming the subscription).
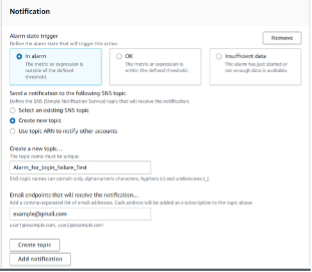
-
Review the CloudWatch alarm configuration details then click Create Alarm. Once created, the alarm will be available on the CloudWatch Alarms page.
In summary, brute force attacks are a reminder that security is an ongoing process, not a one-time event. By implementing robust security measures, training your staff on security best practices, and regularly reviewing your security posture, you can help minimize the risk of brute force attacks and other security threats. Remember, the best defense is a strong offense.
Gradient ingests AWS IAM logs. Our alerting system is configured to look for User Targeting instances and notifies your organization of these occurrences. Please feel free to contact us if you have any questions about this process or need assistance.
.png?height=500&name=Identity%20Access%20Management%20(1365%20x%20768%20px).png)